
There are many cases where you may want to add/remove duplicate input fields dynamically in WordPress metabox to enhance the usability of default posts or custom posts. Here in this article I will show you how to create the front-end of it by using jQuery and then save & retrieve those data to WordPress database.
So I am splitting this tutorial in 2 sections. In first section I’ll show you how to implement the front-end part and in the next will discuss about the backend coding part.
So let’s begin.
1. Creating metabox and using jQuery scripts in the field
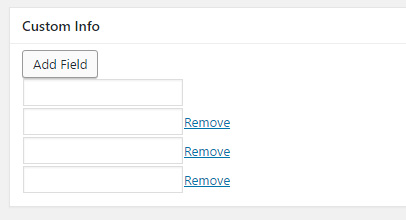
At first we will create the custom metabox as below for the default post type of WP.
To do this first we need to update the functions.php file of currently activated theme. Here is the code below.
// My custom codes will be here
add_action( 'admin_init', 'my_custom_codes_init_func' );

function my_custom_codes_init_func() {
    //$id, $title, $callback, $page, $context, $priority, $callback_args
    add_meta_box('my_custom_info', 'Custom Info', 'my_custom_metabox_func', 'post', 'normal', 'low');
}

function my_custom_metabox_func() {
    ?>
<div class="input_fields_wrap">
    <a class="add_field_button button-secondary">Add Field</a>
    <div><input type="text" name="mytext[]"></div>
</div>
    <?php
}
I have added this code at the bottom of functions.php file, which will create the metabox. Now let me explain you a bit of this code.
add_action( 'admin_init', 'my_custom_codes_init_func' );
This is a predefined action hooks in wordpress to hack into WP admin area and my_custom_codes_init_func is the callback function, which I have defined below. If you want to know more about action hooks then visit this. Within the my_custom_codes_init_func function we have added add_meta_box() method, which is a WP function to add meta boxes (Reference) to posts and it takes few parameters as mentioned at the above comment of the code. As third parameter we have passed the name of the callback function my_custom_metabox_func to implement the necessary HTML in the metabox. At the function we have added a button a add more field and a default input field which later will be duplicated by the help of jQuery.
Now, we are creating a JS file called dynamic-fields.js, where we will write the code below. If you follow the comments in the code then it is quiet strait forward to make you understand what is happening.
var max_fields      = 10; //maximum input boxes allowed
var wrapper         = $(".input_fields_wrap"); //Fields wrapper
var add_button      = $(".add_field_button"); //Add button ID

var x = 1; //initlal text box count
$(add_button).click(function(e){ //on add input button click
    e.preventDefault();
    if(x < max_fields){ //max input box allowed
        x++; //text box increment
        $(wrapper).append('<div><input type="text" name="mytext[]"/><a href="#" class="remove_field">Remove</a></div>'); //add input box
    }
});

$(wrapper).on("click",".remove_field", function(e){ //user click on remove text
    e.preventDefault();
    $(this).parent('div').remove(); x--;
});
Now, we need to link this js file to our admin page. To do this we to again a few more line of codes as below to functions.php file.
add_action('admin_enqueue_scripts', 'admin_enqueue_scripts_func');

function admin_enqueue_scripts_func() {
    //$name, $src, $dependencies, $version, $in_footer
    wp_enqueue_script( 'my-script', get_template_directory_uri() . '/js/dynamic-fields.js', array( 'jquery' ), '20160816', true );
}
Here I have again used an action hook defined by WP to link the script. wp_enqueue_script() is a method (reference) which accepts few parameters as mentioned above comment of the code.
With this we have completed our first section of coding where you can find a properly working add/remove buttons to add/remove input fields dynamically with the help of jQuery.
2. Saving the meta data and display fields properly
Now we have to save the value from this dynamically generated fields to WP database post meta. Here we are again going to use another action hook in functions.php file. The code as following below and descriptions are present there as comments.
add_action('save_post', 'save_my_post_meta');

function save_my_post_meta($post_id) {
    // Bail if we're doing an auto save
    if( defined( 'DOING_AUTOSAVE' ) && DOING_AUTOSAVE ) return;

    // if our current user can't edit this post, bail
    if( !current_user_can( 'edit_post' ) ) return;

    // now we can actually save the data
    $allowed = array(
        'a' => array( // on allow a tags
            'href' => array() // and those anchors can only have href attribute
        )
    );
    // If any value present in input field, then update the post meta
    if(isset($_POST['mytext'])) {
        // $post_id, $meta_key, $meta_value
        update_post_meta( $post_id, 'mytext', $_POST['mytext'] );
    }
}
update_post_meta is a WP function that take 3 parameters and update the meta data for the post or create the meta if not already exists. By this simple code snippet we can save the meta value to WP database. Here we need to note one thing that the value which we submitting to database is an array value, so when we will fetch & display it that time we need to keep it in mind.
After saving meta data successfully to our database, we need to show the values to the fields where we have input the data. Currently it will not display the value to the fields which we have created to input the values but if we check it then we can see it there. Now we will fetch the data and just display data above the fields. so we need to update previous code of where we have created the metabox.
function my_custom_metabox_func() {
    global $post;

    $mytext =   get_post_meta($post->ID, 'mytext', true);
    if(isset($mytext) && is_array($mytext)) {
        foreach($mytext as $text){
            echo $text;
        }
    }
    ?>
<div class="input_fields_wrap">
    <a class="add_field_button button-secondary">Add Field</a>
    <div><input type="text" name="mytext[]"></div>
</div>
    <?php
}

Here as you can see the data is now showing after saving but it is not at the place where it has been typed. so we need to make it dynamic in respect to PHP to show the data in respective fields.
function my_custom_metabox_func() {
    global $post;

    $mytext =   get_post_meta($post->ID, 'mytext', true);
    ?>
<div class="input_fields_wrap">
    <a class="add_field_button button-secondary">Add Field</a>
    <?php
    if(isset($mytext) && is_array($mytext)) {
        $i = 1;
        $output = '';

        foreach($mytext as $text){
            //echo $text;
            $output = '<div><input type="text" name="mytext[]" value="' . $text . '">';
            if( $i !== 1 && $i > 1 ) $output .= '<a href="#" class="remove_field">Remove</a>';
            else $output .= '</div>';

            echo $output;
            $i++;
        }
    } else {
        echo '<div><input type="text" name="mytext[]"></div>';
    }
    ?>
</div>

    <?php
}
Now our saved data showing in their respective fields, but there is one problem. If you check it in our jQuery script then you can find that we have limited maximum number of fields to 10 but if we now try to add more fields then we can see that it will go to 11 fields. And that is because we have already 2 fields available by default and after that it is adding 9 more fields. so in order to make it work properly with jQuery script we need to make the jQuery script know about that there is already 2 fields available from the value of database. To do this we need to take that script to our PHP file and update as necessary. Follow the code below.
add_action('admin_footer', 'my_admin_footer_script');

function my_admin_footer_script() {
    global $post;

    $mytext =   get_post_meta($post->ID, 'mytext', true);
    $x = 1;
    if(is_array($mytext)) {
        $x = 0;
        foreach($mytext as $text){
            $x++;
        }
    }
    if(  'post' == $post->post_type ) {
        echo '
<script type="text/javascript">
jQuery(document).ready(function($) {
    // Dynamic input fields ( Add / Remove input fields )
    var max_fields      = 10; //maximum input boxes allowed
    var wrapper         = $(".input_fields_wrap"); //Fields wrapper
    var add_button      = $(".add_field_button"); //Add button ID

    var x = '.$x.'; //initlal text box count
    $(add_button).click(function(e){ //on add input button click
        e.preventDefault();
        if(x < max_fields){ //max input box allowed
            x++; //text box increment
            $(wrapper).append(\'<div><input type="text" name="mytext[]"/><a href="#" class="remove_field">Remove</a></div>\');
        }
    });

    $(wrapper).on("click",".remove_field", function(e){ //user click on remove text
        e.preventDefault(); $(this).parent(\'div\').remove(); x--;
    })
});
</script>
                ';
    }
}

/*add_action('admin_enqueue_scripts', 'admin_enqueue_scripts_func');

function admin_enqueue_scripts_func() {
    //$name, $src, $dependencies, $version, $in_footer
    wp_enqueue_script( 'my-script', get_template_directory_uri() . '/js/dynamic-fields.js', array( 'jquery' ), '20160816', true );
}*/
Highlighted lines are commented as it is now not needed to load our external jQuery script file as we have now included those scripts to our page footer to make it work with our PHP codes. If you wish you can remove those lines of codes and delete the dynamic-fields.js file, I have commented it here for the reference purpose.
Now it is a fully functional script for WordPress to dynamically add/remove input fields in metabox.
Here is the video representation of this tutorial in Hindi language with the additional code for displaying the fields data in WP theme front-end.
Happy coding 🙂

This is what i really want to do in my site. I tried it and worked as well. but I couldn’t print metabox value where i want to apply. Normally I use to code to print meta box value like ;
$myvalue = get_post_meta($post->ID, ‘mytext’, true);
echo $myvalue ;
I would be grateful to you if you help me to solve the issue.
I’m glad that you liked it and this tutorial helped you to get your work done.
If you see the point 2, then you can find all the necessary code from there to display metabox value to there respective position.
don’t get it 🙂
pls tell me how to display the meta content on the frontend?
Thx in advance.
hello, this is a nice code and tutorial explanations, but as Kabel, i am not getting the ways on displaying the inputed data at the front -end pages of website.
thank you, regards
We have saved the data to post meta by
update_post_meta( $post_id, 'mytext', $_POST['mytext'] );andmytextis an array of data now. If we dovar_dumpof$mytext = get_post_meta($post->ID, 'mytext', true);then we can see the data with its index and value.Then I ran a loop to get each value separately and the function
my_custom_metabox_func()is to display the value within the input fields, where I have checked the index with$iand for the first field I didn’t display the remove field beside it.And the last
admin_footerpart is for our javascript function which completes the interactive features of it. I hope this explanation helps if not then I am planning to make a video tutorial of it and when I make it I’ll post it here.Thank you! It helped me a lot
I am glad that it helps. Thanks for your appreciation. 🙂
Hi, realy love this, but how print this into my layout?
You can post the code?
Thanks
I have made a video representation of this tutorial where I have shown all the steps mentioned here with additional code to display these data in theme layout.
Check this out for clear explanation https://www.youtube.com/watch?v=9HJBXToC_CI
how can i add two or more input field dnymicly using this single add field button
how can i add two or more input field using this “add field” button
If you know JS properly then it is very easy to add more fields there as in the code already we are adding one field dynamically.
great post .. thanks
Glad you liked it.
hi i need to add new option to select dropdown bye add new option in input and save new option in select dropdown Please help me quickly because I’m stuck in it.
Thank you a lot
ohMyGod (thanks) {
for ($i=0; $i<=1 ; –$i++) {echo 'thanks :)’ ;}
ohmygod;
iDoneMyJobWith1MoreInputField.
justIn1stTime.
<3
if(done) {
cheers();
echo ‘happy to help :)’;
}
Great code there!
I am trying to create dynamic Metabox with multiple inputs in it, using your code.
But could not achieve.
Posted my question at stackechange, please look into it.
https://stackoverflow.com/questions/56619731/how-can-i-show-multiple-meta-boxes-with-various-numbers-in-each-post
Can you make a tutorial for dynamic file upload meta box ? like this one
great! it works perfectly.
do you have a solution exactly same but all done in front end?
Cheers!
very usefull code thanks for describing the plugin
Thanks for the excellent training
Nice code. Truly helpful. Will use it in my upcoming plugin.
Special Thanks to Pradip Debnath.
It just wow!!!!!!!!, Thanks for this. It saved my day.
Great Post.
Searching this for long time ago. It’s save my life thank you.